One of our favorite parts of summer is starting every morning with a Boker Big Bang! We’re preparing our experiments for the summer and wanted to share some safe experiments you can practice at home. Share your experiments using #BokerBigBang for a chance to be featured on the Sci-Tech Facebook and Instagram.
SAFETY INFORMATION:
- Always have an adult present when doing experiments
- Always wear protective eyewear and pull hair back
- Wear protective gloves when needed
Experiments
Soda Geyser – Mentos in Coke
Science: This is a physical reaction, rather than a chemical reaction. Carbon dioxide in the coke makes it fizzy, and when the Mentos are added the carbon dioxide molecules attach to the Mentos. This makes a lot of bubbles that rise and push the soda out of the bottle with a wooosh!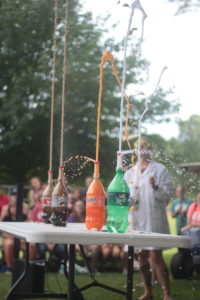
Materials:
Paper
Scissors
Masking Tape
Mentos
2 Liter Soda
Googles
Procedure:
- Cut a piece of paper so that it is as wide as a roll of Mentos.
- Wrap the paper around the pack of Mentos to make a tube. Use masking tape to tape the tube closed.
- Remove the pack of Mentos from the tube.
- Close off one end of the tube by cutting a little circle or square of paper and taping it to one end of the tube.
- Open the pack of Mentos and place all of them in the tube.Slowly and carefully open a new bottle of Diet Coke.
- Place it on a flat area outside where it is OK to get wet with soda.
- Put the open end of your tube of Mentos on the card and place it directly over the opening of the soda bottle.
- When you are ready, remove the card and let all the Mentos drop into the soda at once and quickly move out of the way.
Source: American Chemical Society
Homemade Ice Cream in a Bag
In Honor of our New Workshop – The Science of Food!
Science: The key to making delicious creamy ice cream is for the frozen crystals to be as small as possible. This happens when the mixture freezes extremely quickly. If we just put the mixture in the freezer you would come out with a solid block of frozen cream. By adding salt to the bag of ice, you are lowering the temperature at which water freezes. Salt and other substances that dissolve in water interfere with the molecular bonding that allows water to freeze and form a solid. This is called freezing point depression–artificially lowering the freezing point of ice causing water to freeze and melt below 0 degrees Celsius. Melting is an endothermic reaction, meaning that is requires heat. Therefore, by lowering the freezing point of the ice, it will absorb more heat from its surrounding (mostly the ice cream mixture) in order to melt. This will cause the ice cream mixture to freeze more quickly than if the ice melted at 0 degrees Celsius and therefore produce delicious and creamy ice cream.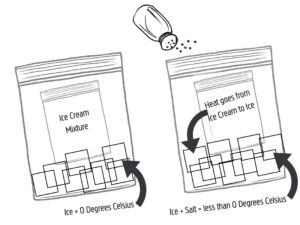
Materials:
Quart-sized Ziploc bag
Gallon-sized Ziploc bag
Ice (about 30 cubes)
¾ cup kosher salt
1 pint (2 cups) half and half
2 tablespoons of sugar
¾ tsp vanilla and/or any other flavorings you want to try
Oven mitts or a towel
Procedure:
- Pour half and half into the smaller bag, and add sugar, vanilla, and any other flavorings.
- Push out extra air and seal carefully.
- Fill larger bag with ice and salt, place smaller bag inside, and seal well. (Be careful to seal the bags well so they don’t leak!)
- Using oven mitts or a towel, shake bag gently for 10 minutes, until contents of smaller bag are frozen.
- Open the smaller bag and enjoy your ice cream!
Source: ReformJudaism.org
Rocket Balloon Car
Science: Every action has an equal and opposite reaction (Newton’s Third Law of Motion). As air leaves the balloon in one direction, the car is propelled in the opposite direction.

Materials:
Cardboard, foam, or Styrofoam trays (typically about 8″ x 6″; ask the butcher at your supermarket for them)
Template: click here to download
Permanent marker
Scissors and tape
Balloon (any size, but the bigger it is, the farther the car will travel)
Bendy straw (any size)
Straight pins (about 1 1/4″ long)
Procedure:
- Use the template to trace and cut out 1 rectangle, 4 wheels, and 4 smaller hubcaps from the cardboard, Styrofoam, or foam.
- Blow up the balloon, then let the air out to make it easier to blow up later.
- Tape the opening of the balloon around the short end of the flexible straw so that no air can escape. You’ll still be able to inflate it by blowing into the straw.
- Tape the long end of the straw down the middle of the rectangle with the open tip hanging off the back.
- Push the pins through the center of the hubcaps, then into the center of the wheels, and then into the edges of the rectangle. Leave a tiny bit of space between each to be sure the wheels can rotate.
- Blow up the balloon through the straw and then pinch the end of the straw closed.
- Place the car on the floor and let it go!
Source: Scholastic